Sections in the article:
- Scoring Widget as a Lead Capture Tool
- Set up your scoring widget
- Viewing widget submissions
- Widget configuration options
- Widget configuration defaults
- Showing the Score on a new page
- Example text for the score results
Scoring Widget as a Lead Capture Tool
The scoring widget is a lead capture tool for Sendmarc Partners. This widget can be installed on your website to obtain leads which are stored in Sendmarc's Partner Portal.
 |
The Scoring Widget gives a customer the ability to check their Domain Score by entering their email address. This takes them to the Domain Score Results page which contains a detailed explanation of the various ratings that make up the overall score for the domain used in their email.
 |
From the results page, customers can be redirected to a contact page of your choice or to the Partner Customer Sign-up Flow.
We also allow the emailing of the detailed report directly to customer's inbox. When "Email Detailed Report" button is clicked it will open a separate request form to display all required fields to complete and receive the detailed report.
 |
Check the widget configuration options to see how you can modify the widget to work for you.
Set up your scoring widget
Here are the steps needed:
- Step 1: Get your unique widget identifier/token
- Step 2: Embed the script code on your website
- Step 3: Create the form
Step 1: Get your unique widget identifier/token
Your widget has a unique identifier code (widget token) that is tied into your account on the Partner Portal and to the website that you choose to embed it on. All submissions will be available on the Partner Portal and each submission will also be sent via an email notification to an email address or addresses that you specify. For this reason, you need to set up your widget token first, which will look something like this:
5de3f4d0-c5br-4f6d-bf14-98ab790b3df1
To create your widget token, follow these 5 steps below:
NB: Log into your account on the partner portal.
1.1. Go to the “Partners” tab located on the left navigation.

1.2. Choose which partner you would like to create a widget for and click the pencil (edit) icon on the right:

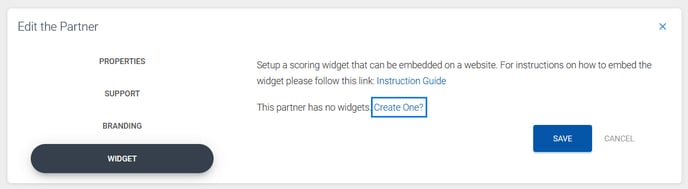
1.3. Click the “Widget” button and a modal will open on the right of the screen. Select the “Create One?” link:
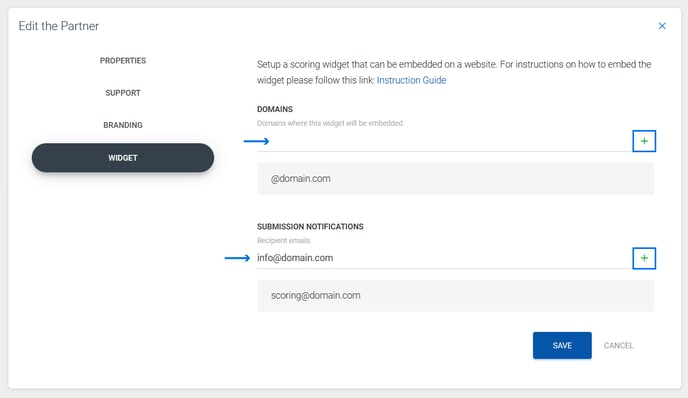
1.4. Add the relevant domain name in the text field and the email address/es where you would like the submission notifications to be sent to. Click the “+” (add) icon after each entry to capture the data. You can add more than one email address for notifications. Click save.
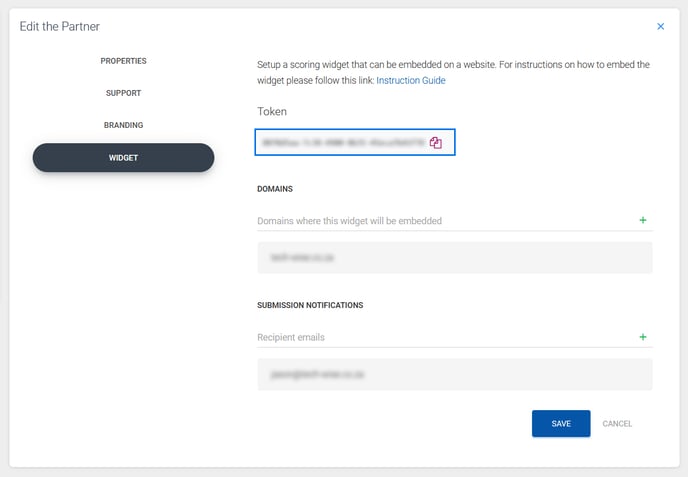
1.5. Your widget token will appear above on the same modal. You can copy and paste this from here to use when setting up your scoring widget on a website or landing page. You can always find the token here if needed.
Step 2: Embed the widget script code on your website
Once you have your unique widget token, you can then embed the widget code in your site. The widget script code is given below.
Copy this code and paste it in the page on your site where you wish the widget to appear. Replace the text WIDGET-IDENTIFIER-GOES-HERE with your unique widget identifier/token. You can also change the config variable to change how you wish the widget to show on your site, as well as to match the styling of your site. The configuration options are detailed at the end of this article.
<script>
(function(w, d, s, o, f, js, fjs) {
    w['SendmarcWidget'] = o;
    w[o] = w[o] || function() {
        (w[o].q = w[o].q || []).push(arguments)
    };
    js = d.createElement(s), fjs = d.getElementsByTagName(s)[0];
    js.id = o;
    js.src = f;
    js.async = 1;
    fjs.parentNode.insertBefore(js, fjs);
}(window, document, 'script', 'smConfig', 'https://madox.sendmarc.com/widget.js'));

// The config below is an example that you can use to get started.
// Change any of the configuration options below to style the widget according to your site
config = {
  version: 2,
  detail: true,
  target: 'sendmarc-widget-form',
  placement: 'modal',
  styles: {
    success: {
      primary: '#16a34a',
    },
    warning: {
      primary: '#ca8a04',
    },
    danger: {
      primary: '#dc2626',
    },
  },
  call_to_action: {
    signup_enabled: true,
    threshold: 100,
  },
  email_detailed_report: {
    enabled: true,
    title: 'Email Detailed Report',
  },
  language: {
    analysis_header: 'Domain score for:',
    loading_text: 'Checking your score...',
    overall_blurb_danger: 'You don\'t have effective controls in place to protect your domain from impersonation and interception of email communication. This puts your brand and email recipients at risk of attacks, reduces trust, and can damage email deliverability.',
    overall_blurb_warning: 'You have some measures in place to protect recipients from malicious email from your domain. Attention should be paid to areas where controls can be improved. These measures build trust in your brand, protect recipients from attacks and help ensure email is delivered effectively.',
    overall_blurb_success: 'Email from your domain is highly secure from impersonation and interception and recipients will see your branding in communication. These measures build trust in your brand, protect recipients from attacks and help ensure email is delivered effectively.',
  },
}

smConfig('**WIDGET-IDENTIFIER-GOES-HERE**', config);
</script>
You can use the scoring page on the Sendmarc site as an example of the kind of content that works for a page like this. Example text is given at the end of this article.
Step 3: Create the form
The next step is to create the form on the same page as the code from Step 2. This is the form that will accept an email address and provide a form submit button. You can use the code below.
<form id="sendmarc-widget-form" novalidate>
   <input type="email" name="email" placeholder="you@example.com">
   <input type="checkbox" id="consent" name="consent">
   <label for="consent">Contact me regarding my score</label>
   <button type="submit"> Check score </button>
</form>
NOTE: keep the form id as shown above.
We have included the option for a user to "consent" to being contacted about their score. If this is implemented, the user has to check the checkbox to consent to store and collect their personal information.
If the consent checkbox is implemented and it is unchecked, only the domain of the email address entered will be stored in the Partner Portal and the email notification will include a message that the customer has not consented to being contacted.
If the consent checkbox is not implemented, the user's email (along with any additional information captured in the form - see below) will be stored in the Partner Portal and emailed to the designated recipients.
If you would like to collect additional contact information, you can do so by using additional input fields. Any fields visible (not hidden) to the user will be considered a required field to complete form submission. The names of the fields that can store and then pass through to you via email are:
- first_name
- last_name
- contact_number
- company_name
- seat_count
- region
A form with all of these could look like this:
<form id="sendmarc-widget-form" novalidate>
   <input type="email" name="email" placeholder="you@example.com">
   <input type="text" name="first_name" placeholder="First name">
   <input type="text" name="last_name" placeholder="Last name">
   <input type="text" name="contact_number" placeholder="Contact number">
   <input type="text" name="company_name" placeholder="Company name">
   <input type="text" name="seat_count" placeholder="Organization Size">
   <input type="text" name="region" placeholder="Region">
   <input type="checkbox" id="consent" name="consent">
   <label for="consent">Contact me regarding my score</label>
   <button type="submit"> Check score </button>
</form>
A form setup for Email Detailed Report could look like this:
<form id="sendmarc-widget-form" novalidate>
<input type="email" name="email" placeholder="you@example.com">
<input type="text" name="first_name" placeholder="First name" hidden>
<input type="text" name="last_name" placeholder="Last name" hidden>
<input type="text" name="contact_number" placeholder="Contact number" hidden>
<input type="checkbox" id="consent" name="consent">
<label for="consent">Contact me regarding my score</label>
<button type="submit"> Check score </button>
</form>
All fields passed through, including hidden fields are considered required for the Email Detailed Report functionality. In the scenario where the widget form should only require the email field, you can make all other fields hidden and they will only be shown in the request form for the Email Detailed Report functionality. If they were shown and completed in the widget form they will be pre-populated. Remember to include the configuration to enable Email Detailed Report, see example below.
Viewing widget submissions
All submissions through the widget are
- sent via email to the recipients provided in Step 1; and
- available to view on Sendmarc's Partner Portal, which can be accessed at partner.sendmarc.com
Widget configuration options
There are numerous ways to style the widget to fit in with the design of your website. These configurations need to be defined in the config section of the script. The options are given below.
Version
The version and detail objects allow you to specify the type of scoring and rating you'd prefer in the widget results.
| Option | Description |
| version |
This options specifies the version of the Widget, it can have the following values: 1: The Widget scoring results will be given with a rating of 5, using the legacy blurbs. 2: The Widget scoring results will be given with a domain score of 100 using the overall blurbs. It will also include additional detail on Impersonation, Privacy and Branding Ratings. NOTE: If the version is not set it will default to version 1. |
| detail (only applicable if version = 2) |
This option allows you to either show or hide the detail ratings for version 2 of the widget. If this option is not included in the config. it is set to true by default which will display the detailed ratings. Options: true/false |
Placement
The placement object defines the placement of results when form is submitted.
| Option | Description |
| placement |
This option specifies the placement of the widget scoring results in the form. It can have one of the following values: modal: The widget scoring results will be displayed as a modal dialog on top of the form. replace: The widget scoring results will replace the form entirely, taking up the same space. appends: The widget scoring results will be inserted under the form. NOTE: you can also set this placement option to the id of any div on your page and it will be appended to that page. For example: placement: 'widget-scoring-result' will result in the results being appended to the div with the id of "widget-scoring-result". |
| modelWidth | This option specifies the width of the widget when it is displayed as a modal dialog. For example: 640px |
| target | This option specifies the id of the div that contains the form to submit the widget submission. |
Styling
The styles object defines the colours used for the low, moderate and high risk graph on the results page.
| Option | Description |
| success.primary | The color for low risk graph borders and backgrounds. |
| success.secondary | The color for low risk graph text. |
| warning.primary | The color for moderate risk graph borders and backgrounds. |
| warning.secondary | The color for moderate risk graph text. |
| danger.primary | The color for high risk graph borders and backgrounds. |
| danger.secondary | The color for moderate risk graph text. |
Call to Action
The call_to_action object defines the options on how to handle the button on results page when domain score falls below a certain threshold.
| Option | Description |
| signup_enabled |
A boolean value that signifies whether the call to action will direct you to your unique partner online sign-up page. If set to false it will use the value of the href. This boolean value defaults to true when not specified. |
| title | A string that represents the title of the call-to-action button that will be displayed to the user whether it directs to sign-up or the URL specified in href. |
| href | A string that represents the URL to which the call-to-action button will navigate when signup_enabled is false. |
| threshold | An integer that represents the email score threshold. If the domain email score falls below this threshold, the call-to-action button will be shown. The threshold is a rating out of 5 for version 1 and a score out of 100 for version 2. |
| classes | A string that represents the CSS classes to be applied to the call-to-action button on the results page. |
Email Detailed Report
The email_detailed_report object defines the options on how to handle the emailing of detailed domain report from the widget results page.
| Option | Description |
| enabled |
A boolean value that signifies whether the "Email Detailed Report" functionality should be enabled and if the button should display. If set to false it will not be visible to the user. This boolean value defaults to false when not specified. |
| button_title |
The string that represents the title of the email-report-action button that will open the request form. |
| button_classes |
A string that represents the CSS classes to be applied to email-report-action button that will open the request form. |
| blurb |
A string that represents the paragraph of text above the request form. |
| submit_button_title |
The string that represents the title of the final email-report-action button that will submit the request to email the detailed report to the user. |
| submit_button_classes |
A string that represents the CSS classes to be applied to the final email-report-action button on the request form. |
You can modify the fields that will appear in the Email Detailed Report request form by passing them in the widget form in Step 3 (see example), all fields passed through whether hidden or not will automatically become require fields to receive the detailed report.
The detailed email report request ignores consent indicated in the widget form. The blurb above the request form refers to consent being given by completing the form, keep this in mind if you are changing the copy. See example of configuration below.
Language and text
The widget text can be customised to follow the language and tone of your website. The language object defines the options on how text can be customised.
| General Options | Description |
| loading_text | Loading text displayed on submission next to button. |
| analysis_header | Header displayed with on results page below domain name. |
| risk_level_danger | Heading displayed for High Risk score and ratings |
| risk_level_warning | Heading displayed for Moderate Risk score and ratings |
| risk_level_success | Heading displayed for Low Risk score and ratings |
| Version 1 Options | Description |
| legacy_score_blurb_danger | High risk results message. |
| legacy_score_blurb_warning | Moderate risk results message. |
| legacy_score_blurb_success | Low risk results message. |
| Version 2 Options | Description |
| overall_result_header | Header displayed with overall score. |
| overall_blurb_danger | High Risk score message. |
| overall_blurb_warning | Moderate Risk score message. |
| overall_blurb_success | Low Risk score message. |
| impersonation_result_header | Header displayed with impersonation rating. |
| impersonation_blurb_danger | High Risk impersonation rating message. |
| impersonation_blurb_warning | Moderate Risk impersonation rating message. |
| impersonation_blurb_success | Low Risk impersonation rating message. |
| privacy_result_header | Header displayed with privacy rating. |
| privacy_blurb_danger | High Risk privacy rating message. |
| privacy_blurb_warning | Moderate Risk privacy rating message. |
| privacy_blurb_success | Low Risk privacy rating message. |
| marketing_result_header | Header displayed with branding rating. |
| marketing_blurb_danger | High Risk branding rating message. |
| marketing_blurb_warning | Moderate Risk branding rating message. |
| marketing_blurb_success | Low Risk branding rating message. |
Widget configuration example
Below is an example of what a custom configuration can look like where the results are appended to the current form and the call-to-action redirects to a contact us page, with the option for use to Email Detailed Report as well as customized language settings:
config = {
 version: 2,
 detail: true,
 target: 'sendmarc-widget-form',
 placement: 'modal',
 styles: {
   success: {
       primary: '#16a34a',
       },
   warning: {
       primary: '#ca8a04',
       },
   danger: {
       primary: '#dc2626',
       },
 },
 call_to_action: {
   signup_enabled: true,
   threshold: 100,
 },
 email_detailed_report: {
    enabled: true,
    title: 'Email Detailed Report',
 },
 language: {
     analysis_header: 'Domain score for:',
     loading_text: 'Checking your score...',
     overall_blurb_danger: 'You don\'t have effective controls in place to protect your domain from impersonation and interception of email communication. This puts your brand and email recipients at risk of attacks, reduces trust, and can damage email deliverability.',
     overall_blurb_warning: 'You have some measures in place to protect recipients from malicious email from your domain. Attention should be paid to areas where controls can be improved. These measures build trust in your brand, protect recipients from attacks and help ensure email is delivered effectively.',
     overall_blurb_success: 'Email from your domain is highly secure from impersonation and interception and recipients will see your branding in communication. These measures build trust in your brand, protect recipients from attacks and help ensure email is delivered effectively.',
   },
}
Widget configuration defaults
Should configs not be defined the following defaults will apply.
Placement
| version | 1 |
| detail (Only for v2) | true |
| target | sendmarc-widget-form |
| placement | model |
| modelWidth | 450px |
Styles
| success.primary | #16a34a |
| success.secondary | #ffffff |
| warning.primary | #ca8a04 |
| warning.secondary | #ffffff |
| danger.primary | #dc2626 |
| danger.secondary | #ffffff |
Call-to-action
| signup_enabled | true |
| title | Sign-up Now |
| href | http://sendmarc.com |
| threshold (v1) | 4 |
| threshold (v2) | 80 |
| classes | _sm-call-to-action-button |
Email Detailed Report
| enabled | true |
| button_title | Email Detailed Report |
| button_classes | _sm-call-to-action-button |
| blurb | Please complete the form below to generate your detailed domain report and send it to your inbox. If you're at risk one of our experts will be in touch to assist. |
| submit_button_title | Email Report |
| submit_button_classes | _sm-call-to-action-button |
Language
| analysis_header | Domain score for: |
| loading_text | Checking your score... |
| risk_level_danger | High Risk |
| risk_level_warning | Moderate Risk |
| risk_level_success | Low Risk |
| legacy_score_blurb_danger | There is little or no protection at all of your domain, with the highest probability that your domain and therefore your company name may be hijacked by criminals and used in fraudulent email activities. |
| legacy_score_blurb_warning | Your domain configuration requires one more change. Deliverability of rightful email may be affected by being sent to spam or junk folders and savvy criminals could impersonate your domain. |
| legacy_score_blurb_success | Your company has a very low risk of your name being used by criminals in fraudulent email activities. Domains with a score of 5 are 100% DMARC compliant and are protected from impersonation and phishing attacks. |
| overall_result_header | Overall Score |
| overall_blurb_danger | You don't have effective controls in place to protect your domain from impersonation and interception. This puts your brand and email recipients at risk of cyberattacks, which reduces trust and damages email deliverability. |
| overall_blurb_warning | You've got some measures in place to shield recipients from harmful emails coming from your domain. But there's opportunity to strengthen your domain's security even more. Taking these steps can boost trust in your brand, keep your business and stakeholders safe from cyberattacks, and help ensure emails are delivered effectively. |
| overall_blurb_success | Your emails are secure from impersonation and interception, plus recipients will see your branding in communication. This builds trust in your brand, protects recipients from cyberattacks, and helps ensure effective email delivery. |
| impersonation_result_header | Impersonation Rating |
| impersonation_blurb_danger | Your domain currently has little to no protection, leaving it vulnerable to cybercriminal use in email-based attacks. This could lead to financial loss, decreased trust and reputational damage. |
| impersonation_blurb_warning | One more change is needed to fully protect your domain. Savvy cybercriminals could still impersonate your business and stakeholders. Deliverability of legitimate email may be disrupted and some messages may land in Spam or Junk folders. |
| impersonation_blurb_success | Your organization has very low risk of cybercriminals using your domain to send fake emails. Domains with a rating of 5 are 100% DMARC compliant and are protected from impersonation and phishing attacks. |
| privacy_result_header | Privacy Rating |
| privacy_blurb_danger | Your domain has minimal to no defenses in place for email privacy. There's a high risk of your communications being intercepted or compromised by unauthorized users. While most senders encrypt their communications by default, it's critical to enforce policies for those that don't. |
| privacy_blurb_warning | You need to tighten up your email encryption. If it's not secure, your emails could be intercepted. |
| privacy_blurb_success | Your emails are at low risk of being seen or intercepted by cybercriminals. Your domain has strong encryption standards and you'll get reports on how well these are being upheld. |
| marketing_result_header | Branding Rating |
| marketing_blurb_danger | Right now, your branding isn't displayed with your emails. Branding builds trust and assures recipients that an email is authentic. We recommend full BIMI implementation for boosted recognition, visibility and trust. |
| marketing_blurb_warning | Your email branding settings need some tweaks. Your logo and verified mark (if applicable) may show in some email clients, but most require a full BIMI setup to display branding. |
| marketing_blurb_success | Your organization uses email branding effectively, making your emails more trustworthy. Your logo and verified mark (if applicable) will be visible to recipients in email clients that support BIMI. |
Showing the score results on a new page
The widget also allows you to show the results of the scoring on a separate page. To do this, you need to do the following:
Starting page:
- In the form tag, change the form submission method from POST to GET, and set the action parameter to the url of the page you wish to show the results on;
- Set the name of the input field to "domain_score";
- Set the 'placement' key on the widget config to a unique name, such as "widget-results". You will be using this on the results page.
- Remove the id="sendmarc-widget-form" from the form tag so that the javascript doesn't intercept the call and the form can then post correctly to the new page.
Here is a basic example of the form:
<form method="GET" action="/score-results">
  <input type="email" name="domain_score" placeholder="you@example.com">
  <input type="checkbox" id="consent" name="consent">
  <label for="consent">Contact me regarding my score</label>
  <button type="submit"> Check score </button
</form>
Results Page:
- Include the widget javascript on the score results page. NOTE: you only need the javascript on the results page - you do not need to include a form.
- Add a div to your score results page that the form will be shown in. Set the id to the unique name you set in your widget config, i.e. "widget-results".
<div id="widget-results">
  <p>This is where the widget will be placed</p>
</div>
Example text to use on the scoring page
Use the Sendmarc https://sendmarc.com/know-your-score page as an example of what a fully styled example page could look like.
Example text used with Widget Form:
Understanding your score
Everyone is at risk from email fraudsters. How do we score your domain safety?
Sendmarc has developed an algorithm that rates an organisation’s exposure to fraudulent email activities such as impersonation, phishing and spoofing, and the risk their current domain poses to the cyber security of their company.
A score between 0 and 5 is assigned to an organisation.
| 5 | A score of five (5) indicates a company has a very low risk of their name being used by criminals in fraudulent email activities. Domains with a score of 5 are 100% DMARC compliant and are protected from impersonation and phishing attacks. |
| 4 | A score of four (4) requires one more change. Deliverability of rightful email may be affected by being sent to spam or junk folders and savvy criminals could impersonate your domain. |
| 0-3 | A score of three (3) or less indicates no protection at all of their name, and the highest probability that their name will be hijacked by criminals and used in fraudulent email activities. |