![Sendmarc-Logo-Dark.png]](https://help.sendmarc.com/hs-fs/hubfs/Sendmarc-Logo-Dark.png?height=24&name=Sendmarc-Logo-Dark.png)
Setup & Verify DMARC delegation
If this is your first time editing your domain, it is important to validate the imported settings against your existing DNS records to ensure that no records were missed as Sendmarc will only import valid records. You'll need to manually add the settings that failed to import. Be sure to do so before enabling DNS delegation.
Steps to follow:
- Navigate to Domains in the left navigation bar.

- Click on the Pencil icon to edit a domain from the list, alternatively click the domain name in the list.

- On the Domain Settings page, click on the DMARC tab confirm the correct settings have been imported/applied and make necessary adjustments where needed.
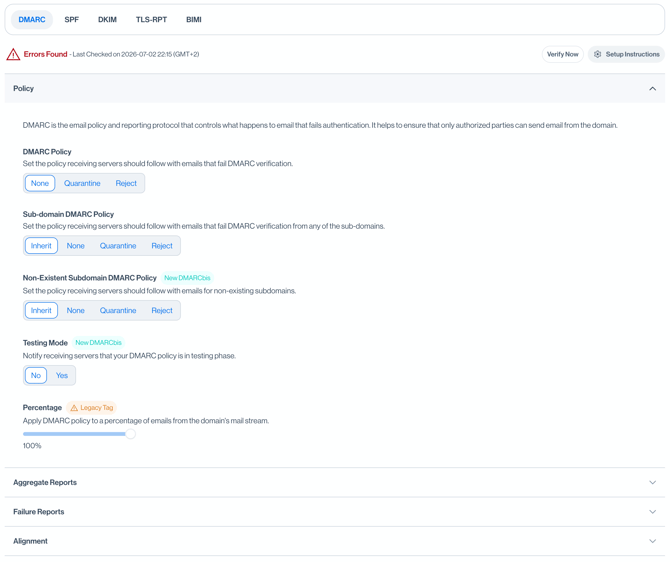
- The RAW DMARC Record is displayed at the bottom of the settings page; this is the hosted record that Sendmarc compiles based on the settings you have set in the platform.
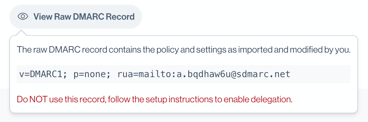
- Once you're happy with your settings go to the DMARC Setup Instructions section to reveal the DNS record required to enable DMARC management for your domain.

- The DMARC Setup Instructions page will show you a step by step guide on the changes required to your DNS records to enable delegation.
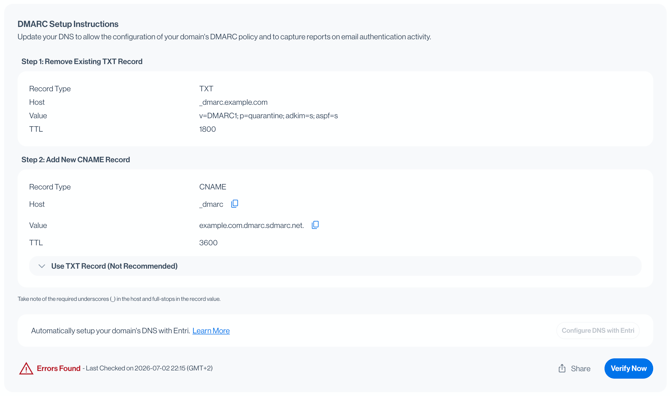 The DMARC Setup Instructions page will contain:
- New CNAME Record - This is the new DNS record to enable delegation
- TXT Record (Not Recommended) - Make use of the raw TXT record to allow partial verification and to start processing DMARC aggregate reports. This method does not allow for full verification and DMARC record delegation which means any changes to settings will not take effect.
- Verification Status - Indicates the various states of verification with the date and time of that the last validation occurred.
- Now add the CNAME record to your DNS to enable delegation. The process of updating your DNS may differ depending on your hosting provider. Visit the Service Provider Section for more information.
- Click Verify to validate your newly added DNS record. It may take some time for the record to reflect, but Sendmarc will continue to attempt verification in the background.
- Once your setup has been fully verified you've successfully delegated the management of your DMARC record to the Sendmarc platform. This will be indicated by a green tick. Sendmarc will start collecting your domain's reports to help you make informed decisions.
Various States of Verification
- Verified - Matching CNAME record found and DMARC delegation is enabled.

- Partial Verification - Matching Aggregate Reporting Address or TXT record found.

- Not Verified & Errors Found - No matching Aggregate Reporting Address or TXT record found.

Setup a Sub-domain
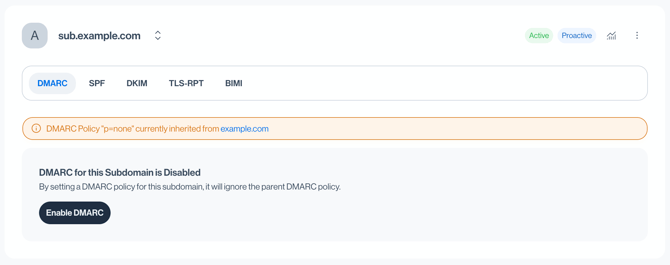 |
When enabled, it will create a new DNS record specifically for the sub-domain. Once verified, you can only disable the sub-domain override by removing the DNS configuration from the sub-domain. Only unverified sub-domain parent overrides can be disabled.
You can also configure the sub-domain policy directly on the parent domain's DMARC settings, check the subdomain policy settings under DMARC Settings.
DMARC Configuration Settings
Understand the various settings available for your DMARC record, these settings will only take affect if DNS delegation has been implemented and verified. Follow the setup instructions above.
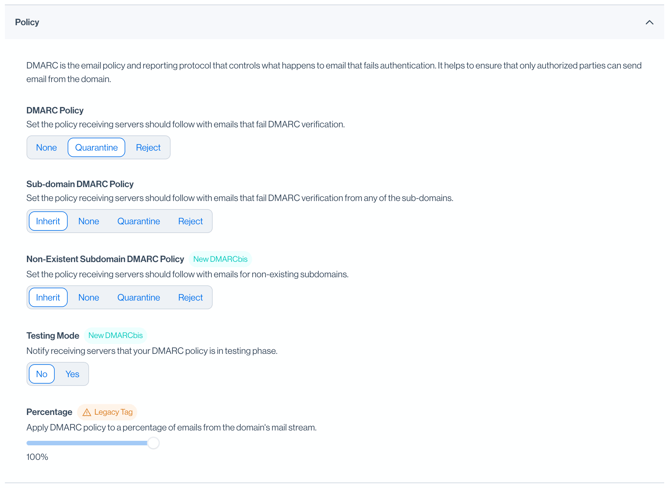
Policy Settings
 |
DMARCbis Now Available: While we have implemented the new DMARCbis protocol, not all receiving mail servers currently support it. We will ensure backwards compatibility is maintained for reliable email delivery regardless of the recipient's infrastructure. Find out more about DMARCbis.
DMARC Policy
The "p" tag, requests receiving servers to allow, quarantine or reject email that fail DMARC verification. You can set this policy to none, quarantine, or reject for unauthenticated messages.
- None - Allows unauthenticated message
- Quarantine
- Reject
Sub-domain DMARC Policy
The "sp" tag requests receiving servers to treat emails from sub-domains differently to emails from the main domain. This policy indicates how you would like receiving servers to treat emails failing from all subdomains.
- Inherit - Automatically inherit from parent domain
- None - Allows unauthenticated message
- Quarantine
- Reject
Non-Existent Sub-domain DMARC Policy (New DMARCbis)
DMARCbis introduces new “np” tag, this policy indicates how you would like receiving servers to treat emails failing from all non-existing sub-domains.
- Inherit - Automatically inherit from parent domain
- None - Allows unauthenticated message
- Quarantine
- Reject
Testing Mode (New DMARCbis)
DMARCbis introduces new “t” tag to notify receiving servers that your DMARC policy is in a testing phase.
- No
- Yes
Policy Percentage (Legacy)
This is the percentage of messages from the domain's mail stream to which the DMARC policy should apply to randomly selected emails.
- 0-100%
Legacy Tag: The “pct” tag is being deprecated but will still be published where needed for backwards compatibility.
Aggregate Report Settings
Often called RUA reports, these reports provide a high‑level summary of all email activity claiming to come from the domain. They show which servers are sending mail, whether that mail is authenticated, and how receivers are handling it. This raw data is captured as the Email Senders Report.
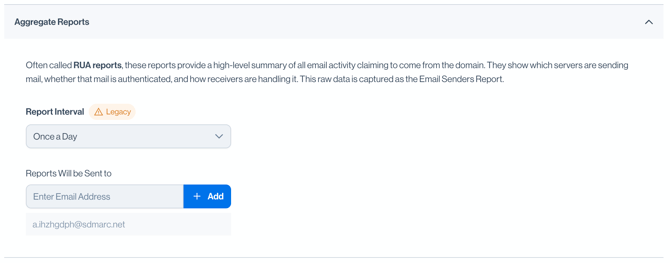 |
Report Interval (Legacy)
Set the interval at which you request aggregate feedback to be sent. Although the interval is requested a reporting server may not adhere to this request.
- Once a Day
- Every 6 Hours
- Every 4 Hours
- Every 2 Hours
- Every Hour
Legacy Tag: The “ri” tag is being deprecated in DMARCbis
Report Recipients
You can specify additional email addresses to which you would like aggregate feedback to be sent. Sendmarc will automatically set your unique reporting email address by default to ensure reports are received by the platform.
Failure Report Settings
Also called Forensic Reports or RUF reports, these reports provide message-level detail when an email claiming to come from the domain fails authentication (SPF, DKIM or DMARC). Enabling this feature will allow Sendmarc to capture this raw data as Failure Reports.
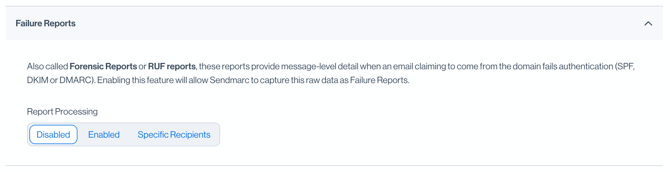 |
Failure Reports Processing
You can choose how you'd like to handle forensic report data. If you are concerned about the privacy of the data contained in these reports, you can choose to process these reports yourself or disable them altogether.
- Enabled - Allow Sendmarc to capture and generate reports
- Specified Recipients - Excludes Sendmarc from recipient list and prevents Sendmarc from capturing reports.
- Disabled
When Failure Report Processing is enabled, you'll be able to add Report Recipients and set Failure Report Options to define when a forensic report should be sent.
- SPF or DKIM Fail and Don't Align
- SPF and DKIM Fail and Don't Align
- DKIM fails regardless of alignment
- SPF fails regardless of alignment
Alignment Settings
Choose strict or relaxed SPF and DKIM alignment. Strict alignment requires the domain used for DKIM signing and the domain used in the "MailFrom" (SPF) to match the "From" domain exactly. Relaxed mode allows for sub-domains to align.
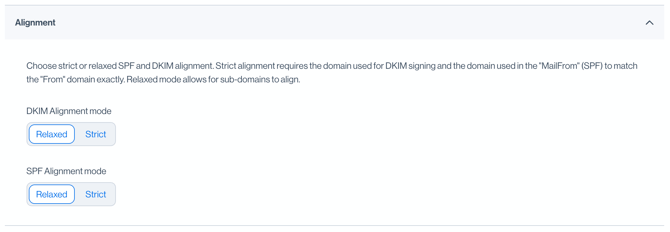 |
DKIM Alignment Mode
Choose whether you would like strict or relaxed DKIM alignment.
- Relaxed - In relaxed mode allows for sub-domains to align.
- Strict - In strict mode the domain used for signing must be the same as the “From” domain.
SPF Alignment Mode
Choose whether you would like strict or relaxed SPF alignment.
- Relaxed - In relaxed mode allows for sub-domains to align.
- Strict - In strict mode the domain used in the “MailFrom” must match the domain in the “From” field exactly.
Need Help?
support@sendmarc.com is standing by to assist!