Enabling Single Sign-On (SSO) with Okta
Simplify user management using SSO from Sendmarc & Okta
Required - The following permissions will be required in order to perform the below actions:
- Account Administrator permissions in Sendmarc
- Administrator permissions in Okta
Enabling SSO with Okta requires the creation of an application in Okta and the enablment of the setting in Sendmarc.
Okta App Creation
First, the application in Okta will need to be created. To do so, an Okta administrator will need to perform the following steps:
- Login to Okta.
- On the left, click the 'Applications' dropdown and 'Applications' to open the correct interface.

- Click 'Create App Integration'.

- Select 'OIDC - OpenID Connect' from the available sign-in method options, and select 'Web application' from the application type and click 'Next'.

- In New Web App Integration interface complete at least the following (all other settings may be left in their default state):
- App Integration Name: Sendmarc
- Sign-in redirect URI: https://portal.sendmarc.com/login/okta/callback
- Assignments - Controlled Access: Ensure all Sendmarc users are granted access.
- Once created, take note of the Client ID and Client Secret, as you'll need these to complete configuration on Sendmarc.

Sendmarc SSO Configuration
To enable SSO with Okta in Sendmarc, follow these steps:
- Login to Sendmarc using your Sendmarc username and password.
- On the left-hand panel, select the 'Account Administration' dropdown and select 'Accounts'. This will open the 'Account Management' interface on the main screen.

- Click the pencil icon on the right of the account for which you'd like to enable SSO. This will open the 'Edit the Account' modal on the right.

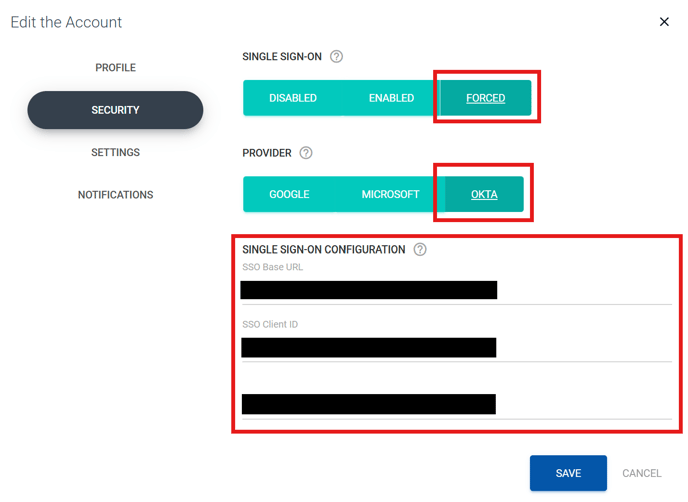
- In the 'Edit the Account' modal, select 'Security'. You will now be presented with a number of options:
- Single Sign-On - This allows you to control whether or not this account will make use of SSO.
- Disabled - Do not allow the use of SSO for this organization.
- Enabled - Allow the use of both Sendmarc username and password as well as SSO.
- Forced - Require all users to use only SSO (i.e. Sendmarc username and passwords are not accepted credentials). If you use this option, you'll also need to select which Sendmarc- supported SSO provider you would like to make use of.
- Two-Factor Authentication (2FA) - This adds an extra layer of security to your account by requiring users to enter a unique code each time they log in. Note that this option is only available if SSO is set to 'Disabled' or 'Enabled'. There are two options available for this setting:
- Disabled - Do not make use of 2FA.
- Forced - Require all users to setup and enable 2FA for Sendmarc.
- Single Sign-On - This allows you to control whether or not this account will make use of SSO.
- SSO Base URL: This is the URL that your users will use to login and will resemble the following 'https://example.okta.com'.
- SSO Client ID: This is copied from the application within Okta.
- SSO Client Secret: This is also copied from the application within Okta.
Once you've input these fields click 'Save'.

Now that SSO has been enabled on Sendmarc, you'll need to logout. Simply inputting your email address will direct your users to the Okta SSO page. 
Upon completion of that sign in process, your users will be directed to Sendmarc. Congratulations! SSO is now enabled for your organization.